The TargetSearch™
Applicant Tracking System was developed as a CRM (Contact
Recruitment Management) system used to
manage data about candidates and their resumes, clients and
their contacts, prospective companies,
job orders, placements, submissions, interviews and all their
pertinent activity.This manual will give step-by-step instructions on how to:
- Add a new position/order
- Search for existing positions/orders
- Add a client/company
- Search for existing clients/companies
- Add a candidate
- Add a contact (Hiring Manager, VP, Human Resources
Professional, etc.)
- Search for candidates/contacts
- Add a new submission
- Generate personal/administrative reports AND most
importantly...
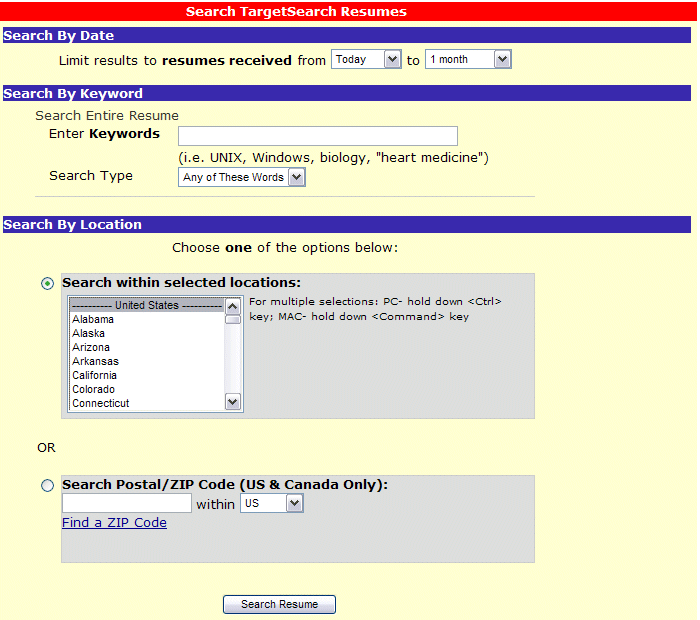
- SEARCH RESUMES - by date, keywords or location.
It will also show you how to:
- Add notes about candidates/contacts and clients/companies
- Add a resume into a candidate screen
- Add follow-up calls
TargetSearch™ is an excellent tool to use as a sales person as it allows
you to keep track of notes regarding sales calls, hiring
managers/contacts, job orders, submissions, prospective
companies to call on, etc.
As a recruiter, TargetSearch™
will allow you are able to keep track of all pertinent data
about the candidates that you speak to on a daily basis and search
for existing candidates to call when an job order comes in.
TargetSearch™
allows you to keep track of the candidate's progress from submission
to placement.
Contents:
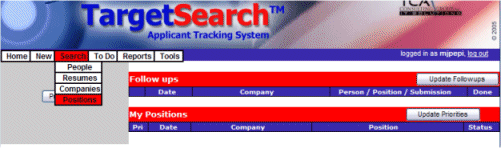
Home Screen
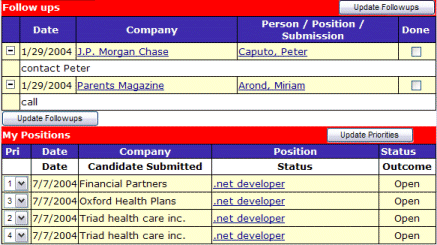
The home screen or 'Home' menu button displays any follow-up
calls that you have scheduled with either a client contact or a
candidate. If you have completed your follow-up (similar
to a task item), check off the corresponding box and then hit
the 'Update Follow-ups' button located at top right.
This screen also displays your open positions with clients
and allows you to click on the corresponding position link to
see its details. On the left hand column you will see a
priority list. When entering the job order, you will be
able to assign a priority rating to the importance of the job
order. 1 noting that this is a very "fillable" order,
due to urgency, how fast the client responds, how reasonable the
rate /salary, etc…5 being the least urgent, least
reasonable salary, hardest to find, etc…
Adding Companies
BEFORE YOU ADD A COMPANY INTO THE
DATABASE PLEASE NOTE: It is important to not add duplicates
into the database so you must search the database to be sure
that the company has not already been added. You can do this two
ways: First you can run a search of the database by clicking on
the subcategory of Search / Modify on the Home screen (we will
go into more detail about how to do this in the Companies -
Search / Modify section of the manual) OR you can enter a few
letters of the company’s name in the Add a Company screen and
hit lookup. If the company name you are about to enter into the
database does not appear in the results, you can then add the
company into the database.
If the company is already in the database,
you can add further notes into the existing company’s screen. If
you notice that no one has had conversations with contacts at
that particular company for quite some time, you may want to
speak with the last salesperson, who spoke to a contact at that
company, to see if they mind if you call on that company to try
to set up an appointment.
Now that we have that important details
covered, let’s explore the Add a Company screen.
It is important to fill in as much
information as possible in the Add a Company screen. This will
provide you detailed information about the company that you are
working with. It is always good to constantly add new
information that you gain about contacts, technologies used,
current events related to that company, etc. The more
information that you have recorded about a company, the better
prepared you are when speaking with people at the company.
Company
Name
This is quite simply, the name of the
company.
Again, if you have not searched to see if
the company has already been added into the database (as
mentioned above), you will want to type in the first few letters
of the company name and click on lookup to be sure that the
company has not already been added to the database. If the
company is not already in the database, proceed by entering in
the full name of the company.
Address
There are a couple of fields under Address.
This is so a complete address can be added, including suite
numbers or any other pertinent details about the address (PO
Box, etc.)
City/State/Zip
This is the city, state (or Providence) and
zip code of the company (sorry folks, just trying to be really
detailed!).
Country
The default is USA. If you are doing
business in another country, you will need to type that in this
field.
Website
It is important that you type in the exact
website address as this will later become a link to that
website.
Phone
List the main number (or toll free number)
in this field. The phone number of your contact (s) will be
listed in the contact’s personal screen.
Revenue
If you know the revenue of the company, you
can add it here.
Year Founded
Simply the year the company was founded.
Standard Fee
%
This is the standard fee for permanent
placements.
Type of
Business
It is important to fill this field in as it
can be used to search for companies (as you will later see in
the Search / Modify section.).
Notes
This is the field where you will add all
notes about conversations that you have had with contacts at
this particular company or record any information that you would
like to keep regarding this company (i.e. directions to the
company, number of people who work at this location, number of
servers, etc.).
After you have entered all of the information into the Add a
Company screen, click on the Add New Company tab in order to
save all of the information you have added.
Companies - Search / Modify
If you need
to search for a company, click on the subcategory of Search /
Modify (under Companies) at the Home screen
and you will be taken to the Search Companies screen.
Once on the
Search Companies screen, there are many different ways
that you can search for companies. You can search by: Company
Name, City, State, Type of Business, Has Positions, Has
Contacts, With Notes containing and Company Skills.
Company Name
You can
search for a specific company by typing in the first few letters
of the company name and clicking on the View Results tab.
If the company is not listed in the database, you can add it.
City
Fill in
this field with a particular city in order to search for
companies that are located in that city.
State
In order to
search for companies, which are located in a specific state,
click on the down arrow next to the State field and
select a state.
Type
of Business
In order to search for a
specific type of business, put key words into this field and
click on the View Results tab. You may have to try a few
different key word searches in order to get the desired results.
Please note
that if people are not entering this information in when they
originally enter a company into the database, this search will
not produce the desired results.
Has
Positions
This will
search for companies that currently have open positions or that
have had open positions in the past (that we have entered into
the database).
Has
Contacts
This search will bring up all
companies that have contacts listed with them.
With
notes containing
This will
allow you to search for key words, which may have been entered
into the company notes field.
Edit Company
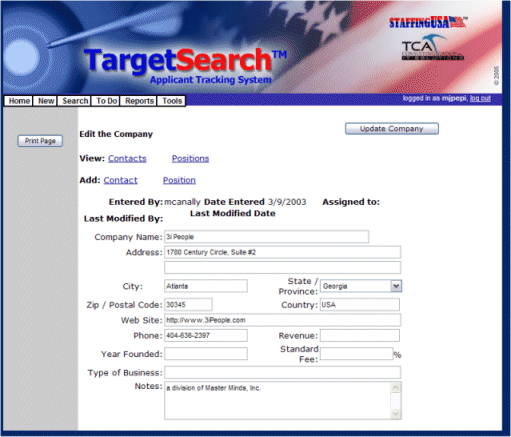
Once inside the Edit Company
screen, you can make additions or changes to the information
that was originally entered into the screen.
You will notice at the top of
the screen; Entered by followed by the user name of the
person who originally entered the Company into the database.
Directly below Entered by, you will see Last Modified
by and a user’s name. This indicates the last user who made
changes to that particular Edit Company screen.
The date that follows Last
Modified indicates the date in which the last changes were
made to that particular Edit Company screen.
From this screen,
you can View Contacts and Positions and Add a Contact
and/or Position. See the screen capture above.
If a web site has been added for
the company, you will notice that Web Site has a blue
line under it. This provides a link that will take you to that
particular company’s website.
Please add in the Web address as
www.domain.com (do not add the preceding http://
The Add a Note field is
probably the most used field in the Edit Company screen.
This field is quite simply the place where you will be adding
all notes regarding conversations that you have with contacts at
this company or any other details that you wish to record about
the company.
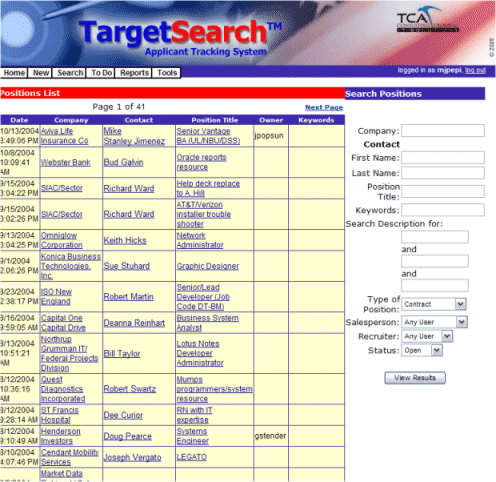
Pri (Priority)
This is the
priority that has been assigned to the position.
Position
This is the
title of the position/order. It is also a link to the Edit
Position screen.
Contact
This is the
contact for the position. This could be a hiring manager or
human resources individual, whomever you are working with to
fill the position/order. This is also a link to Edit Person
screen.
User
This is your user id for the
database.
Note:
After you make all of the necessary additions or changes to the
Edit Company screen, you must click on the Update Company tab in
order to save all the information.
Candidates / Contacts
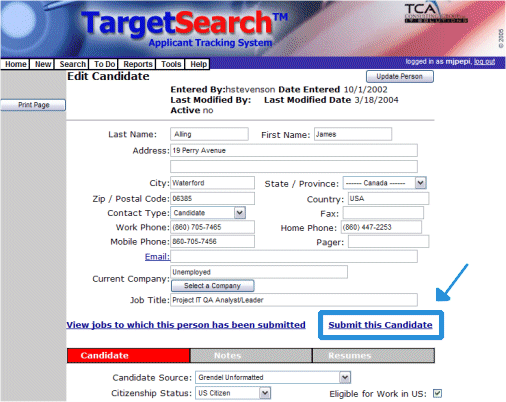
Add a Candidate
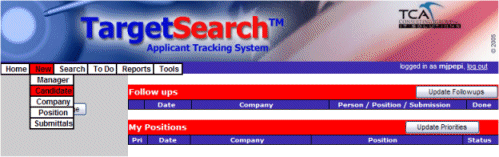
Clicking on
New -> Candidate, will take you to the
Add a Person screen. This screen is used to add
information about a candidate into the database. It is important
that you fill out as much information as possible in this screen
so that you and others can get the maximum use of the database.
BEFORE
YOU ADD A CANDIDATE OR CONTACT INTO THE DATABASE PLEASE NOTE:
It is important to
not add duplicates into the database so you must search the
database to be sure that the candidate / contact has not already
been added. You can do this in two ways: First you can run a search
of the database by clicking on the Search -> Candidate menu (we
will go into more detail about how to do this in the Candidates - Search /
Modify section of the manual) OR you can add a few letters
of the person’s last name in the Add a Person screen and
hit lookup. If the candidate / contact’s name you are
about to enter into the database does not appear in the results,
you can add the candidate / contact into the database. If the
candidate / contact is already in the database, you can add
further notes into the existing candidate /contact’s screen. In
the case of adding a candidate to the database, if the person
who originally entered the candidate into the database has not
spoken to the candidate in quite some time, you may want to
contact the salesperson/recruiter (who originally added the
candidate) to see if they would be wiling to switch the
candidate’s ownership to your name.
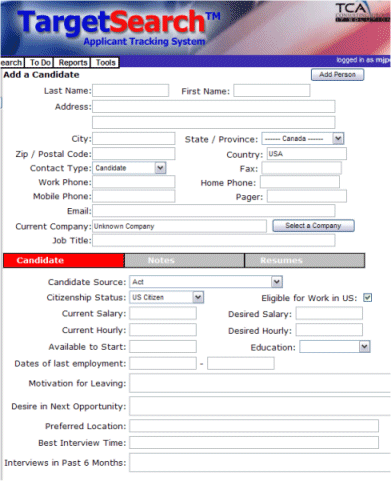
Fill in the
following information about the candidate (if known):
-
Last
Name
-
First
Name
-
Full
Address
-
City
-
State
- click on
the drop down arrow and select the State or Providence
-
Zip
-
Country
- Default is
USA
-
Email
- Double
check to be sure that you have filled this in correctly as it
will later become a link that, when clicked on, will generate an
email to that particular candidate
-
Work Phone
-
Home Phone
-
Mobile Phone
-
Pager
-
Contact Type -Candidate is the
default Contact Type
in the Add a Person
screen. When adding a Contact, you can choose from Director/VP,
Hiring Manager, Human Resources, Lead or Other
-
Fax
-
Current Company/Select Company -Type in the
first few letters of the candidate’s current place of employment
and hit Find Company. If the company appears in the
results, click on the company to highlight it and it will be
saved in the Current Company field after you have clicked
on Add a Person. If the candidate is unemployed, you may
select Unemployed under Select Company. If the
candidate’s current company is not listed in the database and,
you feel that it is of no real value to add the company into the
database, you may select Not Available in the Select
Company field.
-
Job Title - If the
candidate is currently unemployed, type in the candidate’s most
recent title or one that best describes the candidate’s
skills.
-
Candidate Source
- Clicking on
the down arrow next to the Candidate Source field will
bring a drop down list of selections: Unknown (default
selection), Minnesota Jobs, Monster, Headhunter, Web Search
Engine (AltaVista, Dogpile, etc.), Referral, Net-Temps,
Dice, Grendel Unformatted, Job Warehouse and Computer
Jobs.
-
Citizen Status
- The default status is US Citizen. Other choices to select from
include: Green Card, H1B and TN.
-
Eligible for Work in US
- You will
notice that a checkmark is already in the box. If the candidate
that you are entering into the database requires sponsorship,
uncheck the box by left clicking on the checkmark.
-
Current Salary
- This is the
candidate’s current base salary. If you are going to use the
candidate’s total compensation (including bonus, etc.) in this
field, please make note of that in the Notes field so
that others that look at the candidate’s information will know
that this is their total compensation package.
-
Desired Salary
- The number
that I suggest that you put into this field is the actual salary
that the candidate would need to accept an offer. If the
candidate says, “I need $55,000 to make a move but would really
like to see closer to $60,000”, put $55,000 in the Desired
Salary field. You can put that the candidate would like to
see $60,000 in the Notes field if you would like to add
further clarification for other visitors to this candidate’s
screen. If the candidate is open to permanent or contract
opportunities, you can put both the candidate’s desired salary
and his/her desired hourly.
-
Current Hourly
- If the
candidate is a contractor, you will fill in his/her current
hourly rate in this field.
-
Desired Hourly
- The number
that I suggest that you put into this field is the actual hourly
that the candidate would need to accept an offer. If the
candidate says, “I need $55 per hour to make a move but would
really like to see closer to $60 per hour”, put $55 in the
Desired Hourly field. You can put that the candidate would
like to see $60 per hour in the Notes field if you would
like to add further clarification for other visitors to this
candidate’s screen. If the candidate is open to permanent or
contract positions, you can put the candidate’s desired salary
plus his desired hourly in the appropriate fields.
-
Available to Start
- Quite
simply, this is the date that the candidate is able to start a
new position (in the form of MM/DD/YYYY).
-
Education
- Click on
the drop down arrow to the right of the Education field
to select the candidate’s highest level of education. Choices
are: No College, Some College, Technical College (you can
also select this for an Associate’s Degree at this time),
Bachelor, Masters and Doctorate.
-
Dates of last employment
- Enter in
the form of MM/DD/YYYY. If the candidate is still with his/her
current company, leave the right field blank.
-
Motivation for Leaving
- In this field you will indicate the reason why the candidate is
motivated to leave his/her current company and explore new opportunities.
-
Desire in Next Opportunity
- In this
field you will indicate the type of position that the candidate
is looking for. It is also helpful to indicate in this field if
the candidate is interested in contract, contract-to-hire or
permanent opportunities (or all of the above). You can also
indicate other “hot buttons” for the candidate such as: tuition
reimbursement, 3 weeks vacation, growth opportunities, etc.
-
Preferred Location
- This can
mean a certain city, state, geographical area, etc. When working
the Minneapolis/Saint Paul metro area, we indicate areas of the
Twin Cities that the candidate is willing to commute.
-
Best Interview Time
- This is
where you want to indicate days or times that are going to be
best for a candidate to interview (i.e. Tuesday and Wednesdays
or late afternoons or flexible with 48 hours notice, etc.).
-
Interviews in Past 6 Months
- In this box
you can put the number of interviews that the candidate has had,
the companies he or she has interviewed with, etc. I also like
to make note of any pending offers in this field. I may put “no
pending offers as of 10/19, 2nd interview planned
next week with XYZ Company”
Between Job Title and Candidate Source you will notice a
bar with Candidate, Notes, Files, Skills and Call Plan.
All of the information that we filled out above was under the
Candidate section (tab).

-
Notes
- If you
click on Notes, you will be taken to a Notes field
where you can enter any pertinent notes about your conversation
with the candidate. You may wish to indicate the reason for your
conversation with the candidate (i.e. spoke to Alan about the
Systems Engineer/Disaster Recovery opportunity with GMAC/RFC.
Seems like a great fit!), information about the candidate’s
skill set (Alan has 8 years of NT administration, 2 years of
Windows2000, strong communication skills, etc.) and any other
information that you feel will be helpful to remember about this
particular candidate.
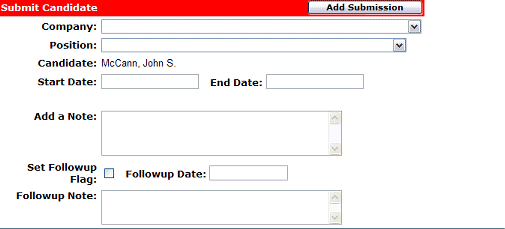
Also in the notes section, you will find the Set Follow-up
Flag and Follow-up Date fields as well a Follow-up
Note field.
-
Set
Follow-up Flag/Follow-up Date
- If you wish
to set up a follow-up call for this candidate, you will want to
left click on the box next to Set Follow-up Flag, which
will make a checkmark appear in the box, and then enter in the
date that wish to make the follow-up call (in the form of MM/DD/YYYY).
-
Follow-up Note
- If there is
a particular subject that you want to cover in your follow-up
conversation with the candidate, you can make a note of it in
the Follow-up Note field so that it will appear with the
follow-up call on the Home screen.
-
Resumes - When you
click on Resumes, you will see a box where you can copy and
paste the candidate’s Text Resume. There is a limit of
7999 characters (I believe) that will fit in this space so, if
the resume is lengthy, you may have to only copy and paste the
most important portions of the resume in this section. There is
also an Attach Resume field. If you have saved the
candidate’s resume somewhere in your files, you can click on
Browse, select the location of the candidate’s resume and
add it to the candidate’s files so that other visitors to the
candidate’s screen will be able to view the candidate’s full
resume.
Add a Contact
(Manager)

*This module is similar to adding a candidate - see above.
People - Search / Modify
If you need
to search for a candidate or contact, click on the menu
of Search -> People.
Once on the
Search People screen, there are many different ways that
you can search for candidates/contacts. If you want to narrow
your results, you can fill in more than one field then click on
the View Results tab at the bottom of the screen. NOTE:
If more than 100 results are found, only the first 100 results
will appear in alphabetical order.
All results
will appear at the left side of the screen in a section called
People List.